
I’ve been setting up my development environment like described in this post since when I started working from home 6 years ago. It’s been great for me and many on my team and I’ve been recommending this to friends for quite a while but I’ve never formalized it.
I want to thank my colleague Ben who got interested and nudged me into writing this :)
What I’m about to describe has additional complexity compared to running everything on a laptop, as most people do, but I think the trade-offs are well worth it.
TL;DR:
Don’t run your development environment on your laptop. Use the laptop as your client (Browser, Slack, Zoom, VSCode) and run your code on another machine (ideally running Linux) that you can connect to with a low latency. This allows you to split the load across multiple computers and separate different load types to different environments.
Below I’ll explain in detail how I’ve been doing it.
The problem I’m trying to solve
Have you ever been on a Zoom call, trying to pair with a colleague and experienced super slow build times? Is your Macbook attempting to fly off your desk when your tests are running? Do you have to reboot your machine regularly?
If the answer is no, I’m really happy for you! If it’s yes, I can guarantee you’re not alone.
Most developers seem to be working on laptops, for good reasons. You can move them around, you can change spot during your day, you can take them with you when you leave the house. But, because of the tradeoffs laptop producers have to make, their performance often is not enough to support our daily workload. Especially at a time when everyone has video conferencing and chat apps opened at all times.
Running a dev stack in 2020 is resource intensive, If you are like my team at PrecisionNutrition you probably have:
- at least one backend (in our case a Ruby on Rails monolith)
- one primary data store (PostgreSQL)
- a secondary data store (Redis)
- a web server (NGINX)
- one or many frontend applications/node processes to build JS apps (in our case webpack for Rails and one or more EmberJS apps)
On top of this, your computer is likely running:
- A couple of browsers
- Slack
- Zoom calls with screenshare
- Code editor
No wonder your having some performance issues.
I’ve previously written about how these days my go-to solution for every project is to use Docker to run services (i.e databases) and use Nix to run the code so that I can have native performance. While this has been a big improvement, informal testing among my team at PN has shown that - particularly of macOS users - build times and general performance are still an issue on laptops.
A client-server approach
The “thin-client” idea is by no means new, but compared to the 80s the big difference is that now gigabit ethernet and high speed wifi are commonly available.
This makes implementing a low latency client-server experience quite affordable.
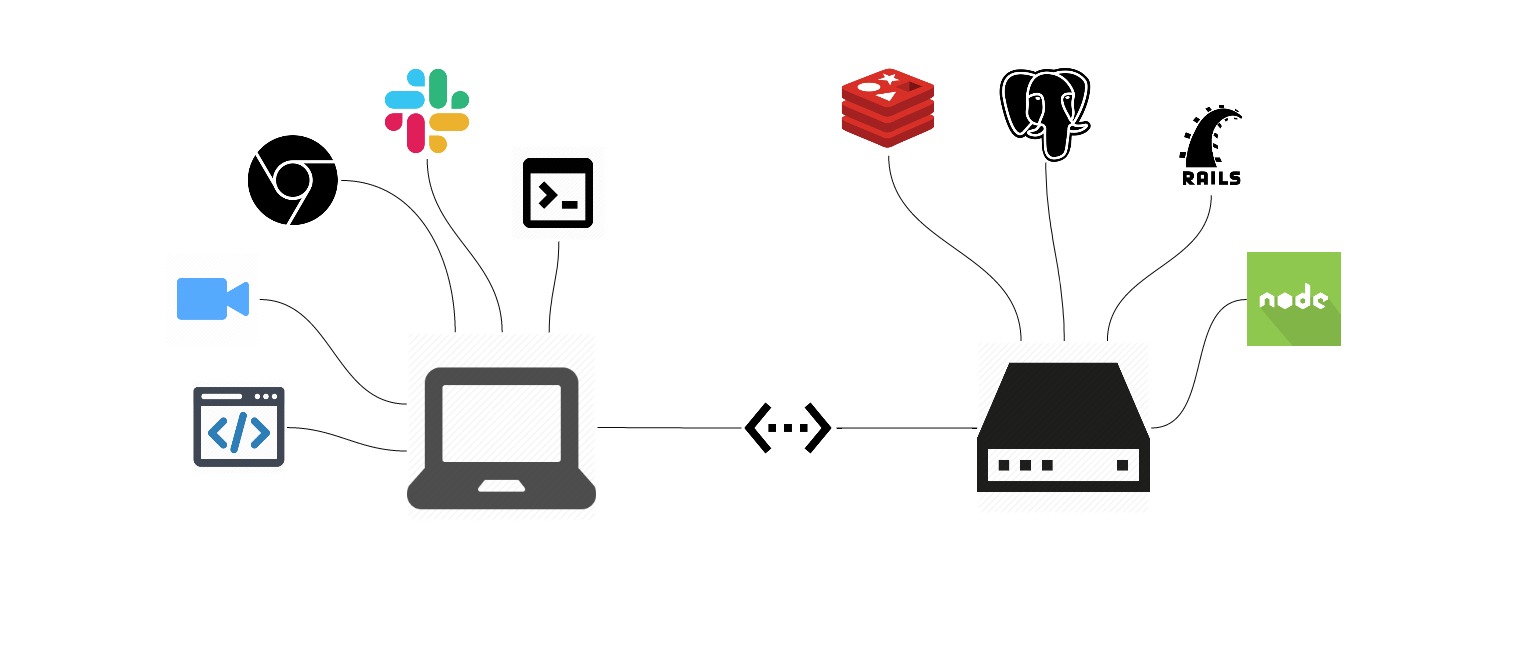
Key components
To implement this approach you will need 3 things:
Client
Whatever you prefer to use as a desktop driver is up to you, this can be your laptop or a desktop computer. It can run macOS, Linux or Windows.
Server
You will likely need to buy this, or if you’re like me and keep a lot of old hardware, you can probably re-purpose an old system you have sitting in storage. The good news is that this machine does not need to be super powerful. I use a 4 year old Intel NUC Skull Canyon and it still outperforms a modern Macbook Pro.
If you are looking for something to buy the newest NUC models look pretty sweet.
Whatever you use, all it has to do is run a modern Linux install, you won’t need monitors or other peripherals once the setup is done.
Network
Your primary goal here is minimize latency. You will be typing on a remote terminal (possibly even a remote editor) and even medium latency can be noticeable. A gigabit network switch or router to connect server and client, alternatively get some fast WiFi but I would recommend plugging in the server directly onto your router.
Setting it up
You found a PC sitting in your basement, or you bought a new fancy NUC. Perfect, here’s what to do next.
Server
If you are not used to Linux this will require some learning, read some guides, be patient, ask for help. If this the case, even though I’m an big NixOS fan, the Linux distribution I recommend to start with is Ubuntu Server LTS; it’s supported well and editors know how to interact with it (see later for notes about VSCode).
If you are used to doing development only on macOS, you will have to figure out what are the equivalent Linux packages for your development dependencies.
Generally speaking in Ubuntu you will end up needing something that looks like this:
sudo apt install build-essential libxml2-dev libz-dev libxslt-dev
Unfortunately this will vary based on your programming language and project so be ready for some googling. If you were to find this too painful it might also be interesting to consider switching to nix-shell.
Once the base setup is done, make sure to enable ssh (apt install openssh-server) so you can start connecting to the server from your client’s terminal app.
Network
Find your router’s DHCP settings page and make sure you instruct it to always assign the same IP to your server, note it down as you’ll need soon. This is important as we will configure your client to resolve an internal domain to your server in the next step.
Note: there are more complex alternatives here, I personally recommend running your own DNS server within your home network but I’ll probably cover this in a future post.
Client
We now need to configure your client so that it will be able to resolve your server, the simplest way to achieve this is to edit resolv.conf.
# the following works on macOS and Linux
sudo vim /etc/hosts
# assuming your server ip is 192.168.1.144
192.168.1.144 myserver myserver.mydomain.local
If you wanna learn more about basic networking on Linux I recommend this fantastic zine from Julia Evans.
Development workflow
At this point you should be able to open a terminal on your client and
ssh myuser@myserver
# then run
python3 -m http.server 8000
if you start an http on your server you should be able to visit http://myserver:8000 in your browser and see it running.
Running your app
From now on every time you need to run any command it will be done over ssh onto your server. To make this a bit easier I recommend using tmux. tmux is a terminal-multiplexer, it allows to manage a remote session with multiple terminals. This way you don’t have to open a new ssh connection for every terminal and the session can stay active even after you disconnect from it. This has other interesting side-effects, i.e. it will allow you to keep your server running even when your laptop goes to sleep or is disconnected from the network.
Once you go back to work in the morning you just have to ssh onto the server, reconnect your tmux session and you’re ready to work.
I almost never shutdown my server and my typical tmux session has several terminals open at all times:
- Rails server
- Rails console
- another terminal where I run rspec
- a terminal that runs one Emberjs application
- in the background docker is running PostgreSQL, Redis and NGINX
- one or more terminals with NeoVIM sessions
If you have never used tmux the tmux 2 book is a great resource, I’ve also heard really good things about The Tao of tmux.
Warning: when running your webserver make sure they are listening on 0.0.0.0 and not on localhost only otherwise you won’t be able to visit http://myserver:YOURPORT
Running a graphical editor
If you are a user of terminal editors like VIM on Emacs you are pretty much set. Use tmux to run your commands and your editor. With the DNS resolution setup correctly, use your browser from your client machine and that’s it.
What about “nicer” editors though? Your code now lives on the server so the editor has to as well or does it?
There are a few solutions I’ve used over the years and YMMV depending on your editor of choice.
Remote VSCode over SSH
If you are a VSCode user you’re in luck, there is a great remote ssh extension that allows you to run a remote code session directly from your local client.
VSCode will also take care of installing itself on the remote system. Opening terminals within the session will give you terminals on the remote system and even the Language Server will work properly because all commands are run remotely.
Mount the server directory locally
This is the one that “should” always work. Install and configure samba on the server, share the directories that have your code and mount them on your client. If you are on a high speed connection even functionality like quick file search should work pretty well.
The main problem with this solution is that you will not get Language Server working without also installing some dependencies on your client. The editor is running locally after all.
Run the editor remotely and forward the GUI over ssh
The X server is what is used to run graphical applications on Linux. The trick is, it does not need to be running on the same machine that is running the graphical application.
If you are running an X compatible server on your client you can “forward” it to the server and the server applications will know to use that when launched. This is a bit mind-bending because your client is now acting as the graphical server for your server…
If you are on linux you likely have X already running, on macOS you will need to install XQuartz while on Windows you will need something like MobaXterm.
The simplest way to get forwarding to work is by using SSH tunneling.
You can try it out like this:
ssh -Y myuser@myserver
sudo apt install x11-apps
xeyes
The xeyes app is running on the server but the output is forwarded to your client. You could install the Ubuntu version of VSCode and run it the same way.
This is not incredibly efficient but depending on your connection speed and your tolerance for latency it might do the trick.
Hardcore: Run the editor remotely and connect to a local X server
A more performant option is to allow the X server running on your client to accept connections from your server directly. This is a bit tricky to do depending on your setup. As an example on Linux this is achieved by passing the option to -listen tcp when the process is started.
Once you have this sorted you can on your client allow insecure connections to your X server by issuing xhost +.
This has some security implications that you should research but I consider it generally safe within my private home network.
Finally in your ssh connection on the server you have to “export” the “DISPLAY” environment variable so that it knows how to connect to the X instance running on your client.
example:
ssh myuser@myserver
export DISPLAY=192.168.1.12 # this is the IP of your client
code
I find that over wired gigabit this solution has basically no latency but as mentioned it requires some extra work to get going.
Some resources you might find useful if this is the way you want to go:
- https://www.lifewire.com/linux-command-xhost-4093456
- https://askubuntu.com/questions/1186002/ubuntu-19-make-x11-listen-and-accept-connections-on-port-6000
- https://askubuntu.com/questions/34657/how-to-make-x-org-listen-to-remote-connections-on-port-6000
- https://timmydosmalltalk.wordpress.com/2016/08/24/startx-listen-tcp/
Props to Luke Galea for showing me this one.
Closing
Admittedly there are some steps involved into setting up an environment of this kind and you will need to commit some time but my experience has been incredibly positive.
A thing that I find myself doing every day is switching from my desktop computer to my laptop seamlessly. This also allows me to work form a fairly under-powered 12 inch laptop with no issues.
My current setup is in fact more complex than the one explained in this article and I plan to cover it in a future blog post. The main change I made (with lots of help from luke) is that the server now hosts an hypervisor that can run multiple virtual machines. This allows me, among other things, to have my own DNS server, simplified local testing on mobile devices, snapshotting of my virtual machines and much more.
Caveats
Aside from the obvious one of having to learn how to do all this and having to buy a server, this setup does not work for every use case:
- It’s not a good match for IOS/Android development.
- It’s also not ideal for any sort of embedded system programming.
- The story for some graphical editors is not ideal. Some don’t have good support for remote directories or remote systems.
- I yet have to find a way to make
nix-shelland VSCode play nicely when using the SSH extension option.
👋 As always, suggestions and corrections are welcome and encouraged! Feel free to reach out to me on twitter or via email [ghedamat at gmail] and let me know what you think!
Many thanks to @typeoneerror and @benjamintmoss for their feedback on this article.